So many learning experiences, all of them valuable. This coil yarn emerged from a dyepot of lobster mushrooms (Hypomyces lactifluorum) a lovely strong orange, just what I wanted for my next experiment: I planned to “highlight” each individual coil with a washing soda solution, which turns the orange into a shade of magenta. Wouldn’t that be striking, I thought—orange yarn with evenly spaced magenta coils.
I towel-dried the yarn as soon as it had cooled and set about painting each coil with a tiny brush dipped in the soda solution. And the results were immediate: magenta coils strung together by an orange yarn. But there was one thing I hadn’t taken into account. A solution painted onto wet fibre will bleed into said fibre—the wicking principle. So when I returned to my studio the next day to admire my results, I was greeted by a beautiful almost-entirely-magenta yarn, punctuated here and there by a few orange strands.
Oh, well . . . that gives me an excuse to spin another coiled yarn and try all over again.
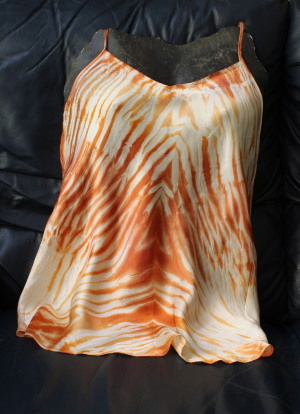
This was interesting. I’d done triple rows of shibori stitching to create a design on the front of this camisole, but the Lobster (Hypomyces lactifluorum) dyebath didn’t give me the vivid red or orange I had hoped for. So I decided to try for graduated colour shifts by letting the bottom half of the camisole sit in the exhaust bath for a couple of days. Then I raised some of it out, leaving the lower part to sit and absorb colour a bit longer. I didn’t heat this up again, but I let the camisole dry without rinsing, then I ironed the whole thing, hoping the heat would help set the colour.
This method seemed to have worked; I rinsed the camisole the following week, and the colour gradations remained.
Even though last year’s harvest of Lobster mushrooms (Hypomyces lactifluorum) was bounteous beyond belief, I’ve been careful about using up all the parings. These wonderful fungi could decide to take a year off this autumn, as has happened in the past, and I don’t want to deplete my supply. Having had success with the Tiger Camisole, I decided to do something similar with the Lobsters.
Camisole in lobster, front
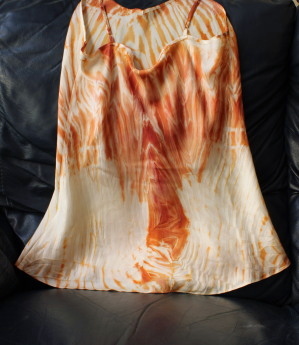
This was interesting: I’d wrapped and tied the silk piece around a stubby glass bottle, which I stood upright in the dyepot. Unbeknownst to me, the bottle had tipped over halfway through the process, leaving a half-dyed part exposed to the air—a happy accident indeed. The half-dyed bits were a brilliant orange, while the fabric that remained in the liquid dyed a deep red. I definitely need to play with this characteristic some more (assuming it will happen again).
A couple of weeks ago, we had a visit from Corinne and Gary Funk of ArtsQuest.ca. Several years ago, they gave themselves an interesting assignment: travel around Canada to interview artists whose work catches their fancy and document their discoveries. They not only blog about each person they visit, but they post video interviews, as well.
My interview is now on their website, and I want to thank them for putting my work in such a good light. They even worked around the distractions provided by my dogs, whose bear bells accompany some of the dialog. (If you watch closely, you’ll see a flash of Rica’s black tail, too!)
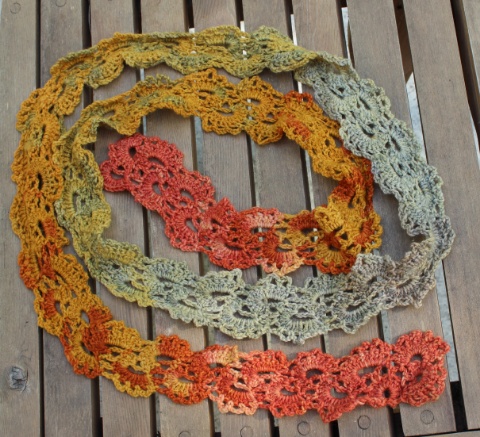
I spin more yarn than I can keep up with, but occasionally I’ll complete something with my mushroom-dyed skeins. Here are my latest:
Omphalotus colours
I wanted to use up all of the precious purple I obtained from last spring’s Omphalotus olivascens dyepot, but I didn’t know just what I could make with it. I wanted something that would highlight the differences between the dark purple from the first dyebath and the lighter shades from the final exhausts. So when I saw the pattern for the Penrose Tile shawl by Carol Feller in the Autumn 2013 issue of PLY Magazine, I knew I’d found the answer.
The shawl is meant to be longer vertically—I ended up with a circular scarf rather than a shawl—but I’m pleased with the results.
*****
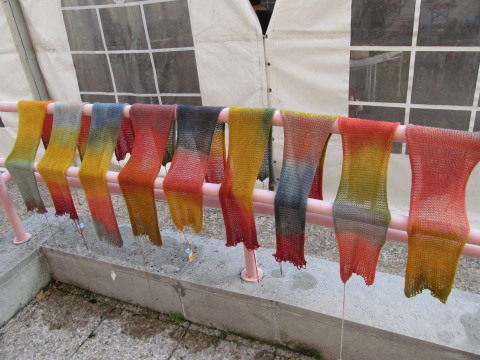
This was an interesting project. It started with machine-knitted “blanks”—rectangles knitted in double strands of white wool. Workshop participants dyed these blanks in three different dyepots, so they looked like this (mine was fourth from the right).
Mushroom blanks
We then took our blanks home and ravelled them. I ended up with a length of yarn that, when folded in half, had identical colour shifts (because the yarn was doubled during the knitting). I looked for something that would take advantage of this symmetry, and found it on Ravelry: Queen Anne’s Lace Scarf.
Three-dyepot crochet
It proved to be an easy take-along project that went together quickly. And it’s a good example of the possibilities that can happen when mushrooms hit the dyepot.
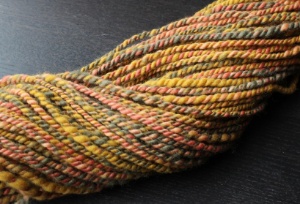
Every aspect of mushroom dyeing and fibre preparation is a joy, and I could always use more time at these pursuits, but the ultimate pleasure, the end goal of all of this, is the spinning. I love to feel the smooth fibres slipping through my fingers as the wheel works its magic and twists them into a thread that winds onto the bobbin. If I’ve blended colours or fibres, it’s exciting to see how they come together into a single strand, and then how plying two or more strands results in a balanced yarn. As I wind the yarn onto my niddy-noddy, the length of it again slides through my hands, and when I’ve tied it into a skein, I get to fondle it once more. Who knew yarn could be so tactile, so sensual?
Two- and three-ply yarns
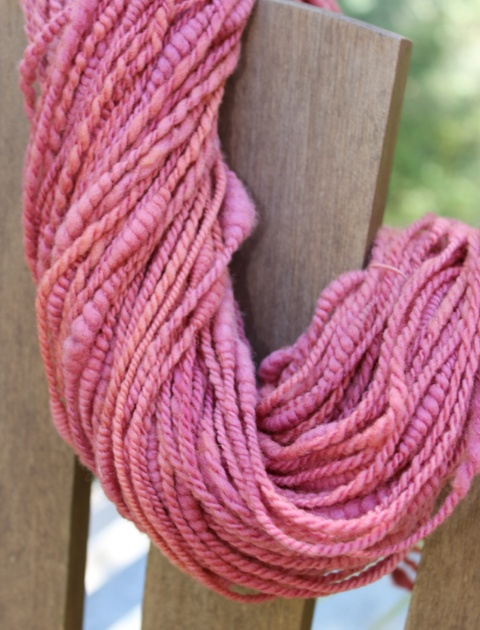
This yarn was the result of carding some blah colours into batts, which I then brightened up with some leftover bits of orange and gold. I spun this deliberately chunky and used two plies of this with one ply of straight Hydnellum green—the result ended up not blah at all. When I ran out of one strand of the chunky, I plied the other with what was left of the green; hence the smaller, greener skein that sits on top.
Dermocybe rose
I love this colour, and until I fire up a few more dermocybe dyepots, this is all I have of it. I added texture by”stacking” a thin ply over the soft texture of a thick-and-thin ply.
Phaeolus gold
I made this yarn from the results of several Phaeolus dyepots, combining shades of gold and green. The “icicle,” a synthetic product, picks up colours wonderfully and adds a bit of zing to the finished yarn.
Thrice-dipped yarn
I had fun with these skeins. I spun them from a soft white roving, my reliably go-to fibre, then dipped parts of them in each of three dyepots: dyer’s polypore (Phaeolus schweinitzii), lobster (Hypomyces lactifluorum), and Hydnellum aurantiacum. The colours overlapped quite nicely.
This beautiful little mushroom, which grew in such abundance last year, has given me some lovely soft greens, but I wanted to see if I could encourage it to give some of the blues I know it’s capable of achieving. So our mushroom interest group—about ten interested members of the Sunshine Coast Spinners and Weavers Guild—focused on this one at our last session.
I’ve had good results by soaking the mushrooms overnight in water with the pH raised to 12 with ammonia, but this time I decided to use washing soda because we’d be cooking the mushrooms indoors, and the odour of washing soda is decidedly less caustic than that of ammonia. I also wanted to try other methods of bringing out the colour, along with a few mordants for each method.
Hydnellum colours
In this image, each group of three skeins represents a different mordant, from left to right: no mordant, alum, iron, and copper
The three skeins in each group were processed as follows, again from left to right:
Mushrooms were soaked overnight in well water (pH 5.8). The following day, the skeins were added to the dyebath, which was brought to a slow simmer until the skeins were fully dyed.
Mushrooms were soaked overnight in well water brought to a pH of 12 with the addition of washing soda. The following day, the skeins were added, then the dyebath brought to a slow simmer until the skeins were fully dyed.
Mushrooms were soaked overnight in well water, then brought to a temperature of 170 degrees F. The dyebath was held at this temperature for 15 minutes, at which time the skeins were added and simmered until fully dyed.
We were pleased with the beauty of all of these colours, and I think I’ve convinced a few more potential mushroom dyers to enter this “dark hole”!
Just recently I’ve noticed a lot of interest in mushroom dyeing in my community, so I’m excited about getting other people excited!
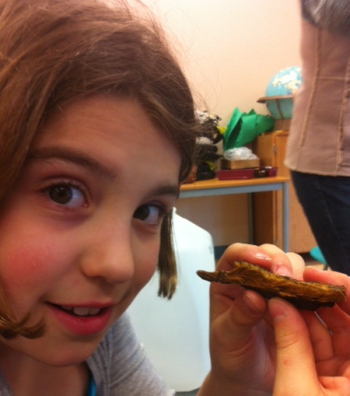
An art class of eight- and nine-year-old girls invited me to show them what it involves. Most of them had been told by their parents (as was I, many years ago) that you should never, ever touch a mushroom because it could kill you. I understand the fear behind that admonition, but we don’t tell our children to never, ever touch any leaves or wild berries, even though some of those can be pretty dangerous, too. We teach them not to eat anything in the wild without first knowing what it is, and that’s how it should be with mushrooms, as well.
The dried mushroom
So I put the class to work breaking up a good selection of dried Phaeolus schweinitzii and putting the pieces into fine lingerie bags—this polypore had acquired a bit of fuzzy fungus of its own, but that didn’t seem to affect the end colour.
Getting comfortable with mushrooms
And it wasn’t long before everyone was right into it.
Mordanted samples
We talked about mordants and how they work, and everyone prepared samples. I follow the practice of giving each sample a different number of knots, depending on its mordant. Traditionally, this was:
Although some dyers use chrome and tin, I prefer not to, so I couldn’t see myself tying four and five knots in my copper and iron samples when I didn’t have to. So I’ve devised my own easier system: No mordant: no knot; Alum: 1 knot; Iron: 2 knots; Copper: 3 knots. (The word iron has fewer letters than the word copper, my way of remembering the knots.)
Into the dyepot
The dyepots had been simmering while we got the samples ready, then everyone watched with interest as the samples went into the hot liquid, along with some pieces of wool batt. The anticipation built as the pots simmered and the classroom filled with the unmistakable odour of cooking mushrooms.
Mushroom colour!
At last, the wool was ready! I understand everyone went home with some good dinner-table stories, and in a few weeks we’ll get together again and use this wool to make little felted bowls.
Then the following week, a few members of the Sunshine Coast Spinners & Weavers Guild got together for the first of three mushroom workshops. We’re focusing on one mushroom per session, which gives everyone a chance to learn what to look for and where to find it, and we also have more opportunity to experiment with that mushroom. In this case, I wanted to see if we’d get much difference between well water and chlorinated water, so one of the members who’s on a city system brought a couple of containers of her water.
Phaeolus dye samples
Our samples were premordanted with alum, iron, and copper, and we also put some alum-mordanted samples in iron and copper afterbaths. Unfortunately, we didn’t get the bright gold of the children’s dyepot, but we did find that using chlorinated water made only a marginal difference in the colours. More images of that day can be found at the blog of the Sunshine Coast Fibreshed, a new affiliate of the larger Fibreshed movement promoting local fibres, local dyes, and local artisans. We’re excited to see how this is taking shape, and mushroom dyeing certainly fits within this idea.
Or rather, out with it, damn Squirrel—where did you stash all my Boletopsis?
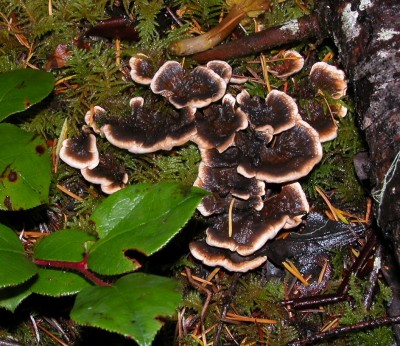
Only once in the last six years did I see a Boletopsis: a mushy blob another dyer had found and frozen in a glass jar. But I saw the beautiful colour resulting from its dyepot, so I resolved to find one of my own someday. That day took a long time to arrive.
Last fall, a record mushroom season in this area, a fellow SHROOMer found a couple of Boletopsis grisea on one of our club forays. He didn’t recognize it, and it didn’t take much convincing for him to decide he didn’t want to eat it (technically they’re edible, but apparently they’re very bitter). I took the mushrooms back to my studio and soaked them in a 50:50 water/ammonia solution, which resulted, after cooking, in some lovely sage-y green samples.
So imagine my delight when I came upon a mass of these mushrooms a few weeks later! Actually, it was my dearest who found them, and it took me several minutes to scramble through the mossy windfall to their location—I could tell by the excitement in his voice that it had to be something worth scrambling for.
And this is just a part of what he’d found:
Boletopsis grisea
Once again, I was beside myself with joy at the mushroom’s capability of producing in huge abundance . . . not every year, necessarily, and not every mushroom, but when conditions are right, fecundity is the word. I harvested carefully and with gratitude, then took them home to dry.
Ordinarily these fungi would have hit the dyepot the next day, but did I mention that 2013 was a particularly amazing year for mushrooms? We were out in the forest every day, coming home with piles and piles of fungal beauties, so I had no choice but to spread them out to dry on my studio floor while I was out gathering more . . . and more . . . and more.
I ran out of floor space, so I started laying mushrooms out in the space underneath my studio: a latticed enclosure on a fairly steep slope. I can stand at the lower end, but have to stoop to get to the upper end. The mushrooms found this space to their liking and began to dry quite nicely.
The season done, I was ready to fire up the dyepots, and of course I wanted to see what colour all of these Boletopsis would give me. I went down to get the cardboard tray they’d been drying on, only to find it mostly empty! What?!
In disbelief, I poked around among the crates and boxes occupying most of the under-studio space, and found some other dried mushrooms (Phaeolus schweinitzii and Hydnellum aurantiacum) had been scattered haphazardly around the space. But no Boletopsis . . . I can only assume that the squirrels sensed their edibility and squirreled them away, as is their wont, to nosh on over the winter.
And we have seen some very chubby squirrels around the property this spring.
Colour from Boletopsis grisea
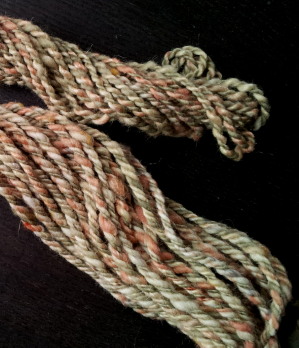
They did leave me with a few, though, and these gave me a really wonderful green, enough for one of the plies in a three-ply chunky yarn, with what was left going into a smaller skein of two-ply.
Handspun with one ply Boletopsis green
I live in the forest. I am happy to share with the forest. Squirrels are creatures of the forest. Damn them.
Early on in my mushroom dyeing [buzzword alert] “journey,” I did all of my experiments with commercial yarn, as I wanted to see how many different colours I could obtain in one season. I played with random combinations of three different colours; no matter which colours I put side by side, they always went well together. (I posted about this on January 19, 2011, and again on January 24).
Now I’m playing with colours again, this time in my handspun yarns. In this case, I blended three stripes on my drumcarder, putting them through once. (The colours came from Phaeolus schweinitzii, Tapinella atrotomentosa, and dermocybe dyepots.) Then I drafted the entire batt into a roving the right size for spinning. The colours remained as separate stripes in the roving and into the yarn.
Proving once again that mushroom dyes sit well together.
CELEBRATING THE BEAUTY OF SUNSHINE COAST MUSHROOMS