All posts by Shroomworks

In 2003, my dearest and I decided to move to and build in an area surrounded by rainforest on BC's Sunshine Coast. So I thought it would be wise to learn about mushrooms. Little did I know that this new interest, combined with my joining the local spinners' and weavers' guild, would lead to a new passion: dyeing fibre with mushrooms. I was lucky enough to attend the 13th International Fungi & Fibre Symposium in Mendocino, California, in 2008, and from the good people there, I learned a great deal and was inspired to come home and learn even more. The story has just begun . . .

Sole mates


Mushroom paper shoes

My dyepots have been cool for several months now—fall is the time for collecting dye mushrooms, and it was a fairly good season, all in all—so here’s a photo of something else I made in the summer. These were in response to a call for entries for an exhibit, “Under My Feet,” put on by my fibre mentor and textile artist extraordinaire, Yvonne Stowell, in her lovely space, FibreWorks Gallery, in Madeira Park.

Papermaking takes second place to dyeing and spinning, but occasionally I get the urge to mix up a vat of mushroom pulp, pull out the molds and deckles, and make a right good mucky mess. Yvonne’s call for entry came at a time when I decided I needed some slip-on shoes specifically for my studio (the bright orange Crocs just don’t do it for me), so I used a pair of almost-falling-apart house slippers as molds.

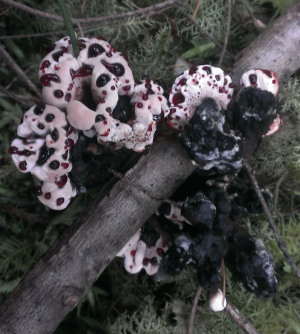
I first made the soles (using pulp made from red-belted conk, or Fomitopsis pinicola), cutting several layers of paper around an outline of the slipper soles and pressing them together—”laminating” sounds more sophisticated, doesn’t it? Then I draped more cut-to-shape pieces over the tops, again pressing several layers together. I hadn’t planned how to secure the various parts to the soles, but my hands naturally went into piecrust mode, and that seemed to work, so for continuity, I continued that pattern around the backs of the soles. The shoes needed some embellishment, and I had lots of leftover Dyer’s Polypore (Phaeolus schweinitzii) pulp on hand, and I used that to make some brown diagonal bands. Phaeolus pulp is quite crumbly, and I had to be careful to keep it from falling apart.

I covered everything loosely with plastic wrap, to keep the shoes from warping, but after a few weeks I noticed bits of white mold were taking root. I removed the slippers and stuffed the openings with crumpled newspaper, placed them on a mesh screen to encourage the bottoms to dry, and left them under a very loose tent of plastic.  When everything had dried, the dark brown bands were still crumbly, so I gave everything a waterproofing coating.

Mushroom paper being what it is, I didn’t expect to come up with anything dainty or delicate; “robust” is probably a better word to describe these (although they weigh almost nothing). However, they’ll end up being for display only—these thick soles have absolutely no capacity to bend, and stomping around flat-footed is a bit ungainly!

Don’t expect me to create a line of fashionable paper shoes—not in the immediate future, anyway.

Announcing . . . 2016!

2016

Mark your calendars: In October of 2016. the 17th International Fungi & Fibre Symposium will be coming to Pender Harbour! When the announcement was made at the most recent Symposium in Estonia, the room erupted in cheers—the event has never been held in Canada before, and everyone was thrilled to bits at the prospect of checking out our dye mushrooms in British Columbia’s coastal rainforest.

The wonderful members of the Sunshine Coast Spinners and Weavers Guild are enthusiastic about putting on an event to remember, and members of the Sunshine Coast Society for the Hunting, Recognition and Observation of Mushrooms (hereafter known as SCHROOM) are already busy collecting the mushrooms we’ll need to keep the dyepots going.

Estonia colours

It’ll be a while yet before we get the details hammered out, but let me know if you’d like to be on our mailing list. Or just keep an eye on this blog.

Mushroom season 2014: bring it on!

Hydnellum peckii
Hydnellum peckii

We’ve had to wait for mushrooms this year, almost longer than my patience could tolerate, but the welcome rains of two weeks ago were enough to coax most of the regulars out, albeit in fewer quantities than we found last year . . . except for today’s find, which appeared in numbers I’ve never seen before in one place: fresh, beautiful clusters of Hydnellum peckii in a ring around a couple of medium-size Douglas fir. When they’re fresh and oozy like this, it’s easy to see why they’re called Strawberries and Cream. (My hands were stained red for hours after picking them!)

I love how these and other toothed fungi engulf whatever’s in their way. This one had not only eaten a couple of sticks, but it was doing its best to devour a branch in its path.

H. peckii  engulfing a stick
H. peckii engulfing a stick

In the same forest were a good number of Hydnellum aurantiacum, which is more common in these parts. (You can see the teeth in this image.) I can expect some lovely greens out of both Hydnellum dyepots.


Hydnellum aurantiacum

As of now, I’m setting aside half of my mushroom treasures for other reasons; stay tuned to find out!

Playing with lobsters, Part IV

Lobster scarf_1
Lobster scarf_1
Lobster handprint scarf_2
Lobster scarf_2

Lobster dyepots are so magnanimous, and this was the last gift my most recent dyepot gave me before its colour was exhausted. The scarf started out a so-so shade of pink, so I had an idea to fold it loosely into diagonal accordion pleats and paint the edge of each fold with a solution of washing soda and water, to make a design of purple stripes. Yet another lesson: a solution painted onto damp silk will not stay put but will spread as far as it can into the fabric. But that was okay—the scarf, when dry, was an attractive shade of purply-pink, mottled with the original so-so pink.

But it still needed something. Having little to lose at this point, I decided to use a vinegar solution, at the other end of the pH scale, to paint some stylized handprints on the fabric. But this time I had my iron at the ready, and each “finger,” after being brushed on, was immediately cauterized. The effect was more pronounced when the design was still wet, but it’s still there, adding what I hope is a pleasing visual texture.

At that point it was time to stop. Thank you, Hypomyces lactifluorum.

Playing with lobsters, Part III

IMG_3769

So many learning experiences, all of them valuable. This coil yarn emerged from a dyepot of lobster mushrooms (Hypomyces lactifluorum) a lovely strong orange, just what I wanted for my next experiment: I planned to “highlight” each individual coil with a washing soda solution, which turns the orange into a shade of magenta. Wouldn’t that be striking, I thought—orange yarn with evenly spaced magenta coils.

I towel-dried the yarn as soon as it had cooled and set about painting each coil with a tiny brush dipped in the soda solution. And the results were immediate: magenta coils strung together by an orange yarn. But there was one thing I hadn’t taken into account. A solution painted onto wet fibre will bleed into said fibre—the wicking principle. So when I returned to my studio the next day to admire my results, I was greeted by a beautiful almost-entirely-magenta yarn, punctuated here and there by a few orange strands.

Oh, well . . . that gives me an excuse to spin another coiled yarn and try all over again.

Playing with lobsters, Part II

1
This was interesting. I’d done triple rows of shibori stitching to create a design on the front of this camisole, but the Lobster (Hypomyces lactifluorum) dyebath didn’t give me the vivid red or orange I had hoped for. So I decided to try for graduated colour shifts by letting the bottom half of the camisole sit in the exhaust bath for a couple of days. Then I raised some of it out, leaving the lower part to sit and absorb colour a bit longer. I didn’t heat this up again, but I let the camisole dry without rinsing, then I ironed the whole thing, hoping the heat would help set the colour.

This method seemed to have worked; I rinsed the camisole the following week, and the colour gradations remained.

Playing with lobsters, Part I

Even though last year’s harvest of Lobster mushrooms (Hypomyces lactifluorum) was bounteous beyond belief, I’ve been careful about using up all the parings. These wonderful fungi could decide to take a year off this autumn, as has happened in the past, and I don’t want to deplete my supply. Having had success with the Tiger Camisole, I decided to do something similar with the Lobsters.

Camisole with lobster, front
Camisole in lobster, front

This was interesting: I’d wrapped and tied the silk piece around a stubby glass bottle, which I stood upright in the dyepot. Unbeknownst to me, the bottle had tipped over halfway through the process, leaving a half-dyed part exposed to the air—a happy accident indeed. The half-dyed bits were a brilliant orange, while the fabric that remained in the liquid dyed a deep red. I definitely need to play with this characteristic some more (assuming it will happen again).

Camisole with lobster, back
Camisole in lobster, back

This is the back view.

Thanks, ArtsQuest!

A couple of weeks ago, we had a visit from Corinne and Gary Funk of ArtsQuest.ca. Several years ago, they gave themselves an interesting assignment: travel around Canada to interview artists whose work catches their fancy and document their discoveries. They not only blog about each person they visit, but they post video interviews, as well.

My interview is now on their website, and I want to thank them for putting my work in such a good light. They even worked around the distractions provided by my dogs, whose bear bells accompany some of the dialog. (If you watch closely, you’ll see a flash of Rica’s black tail, too!)

Some finished projects

I spin more yarn than I can keep up with, but occasionally I’ll complete something with my mushroom-dyed skeins. Here are my latest:

Omphalotus colours
Omphalotus colours

I wanted to use up all of the precious purple I obtained from last spring’s Omphalotus olivascens dyepot, but I didn’t know just what I could make with it. I wanted something that would highlight the differences between the dark purple from the first dyebath and the lighter shades from the final exhausts. So when I saw the pattern for the Penrose Tile shawl by Carol Feller in the Autumn 2013 issue of PLY Magazine, I knew I’d found the answer.

The shawl is meant to be longer vertically—I ended up with a circular scarf rather than a shawl—but I’m pleased with the results.

*****

This was an interesting project. It started with machine-knitted “blanks”—rectangles knitted in double strands of white wool. Workshop participants dyed these blanks in three different dyepots, so they looked like this (mine was fourth from the right).

Mushroom blanks
Mushroom blanks

We then took our blanks home and ravelled them. I ended up with a length of yarn that, when folded in half, had identical colour shifts (because the yarn was doubled during the knitting). I looked for something that would take advantage of this symmetry, and found it on Ravelry: Queen Anne’s Lace Scarf.

Three-dyepot crochet

It proved to be an easy take-along project that went together quickly. And it’s a good example of the possibilities that can happen when mushrooms hit the dyepot.

Spinning a few yarns

Every aspect of mushroom dyeing and fibre preparation is a joy, and I could always use more time at these pursuits, but the ultimate pleasure, the end goal of all of this, is the spinning. I love to feel the smooth fibres slipping through my fingers as the wheel works its magic and twists them into a thread that winds onto the bobbin. If I’ve blended colours or fibres, it’s exciting to see how they come together into a single strand, and then how plying two or more strands results in a balanced yarn. As I wind the yarn onto my niddy-noddy, the length of it again slides through my hands, and when I’ve tied it into a skein, I get to fondle it once more. Who knew yarn could be so tactile, so sensual?

Two- and three-ply yarns

This yarn was the result of carding some blah colours into batts, which I then brightened up with some leftover bits of orange and gold. I spun this deliberately chunky and used two plies of this with one ply of straight Hydnellum green—the result ended up not blah at all. When I ran out of one strand of the chunky, I plied the other with what was left of the green; hence the smaller, greener skein that sits on top.

Dermocybe rose
Dermocybe rose

I love this colour, and until I fire up a few more dermocybe dyepots, this is all I have of it. I added texture by”stacking” a thin ply over the soft texture of a thick-and-thin ply.

Phaeolus gold
Phaeolus gold

I made this yarn from the results of several Phaeolus dyepots, combining shades of gold and green. The “icicle,” a synthetic product, picks up colours wonderfully and adds a bit of zing to the finished yarn.

Thrice-dipped yarn
Thrice-dipped yarn

I had fun with these skeins. I spun them from a soft white roving, my reliably go-to fibre, then dipped parts of them in each of three dyepots: dyer’s polypore (Phaeolus schweinitzii), lobster (Hypomyces lactifluorum), and Hydnellum aurantiacum. The colours overlapped quite nicely.

Now my spinning wheel is calling me.